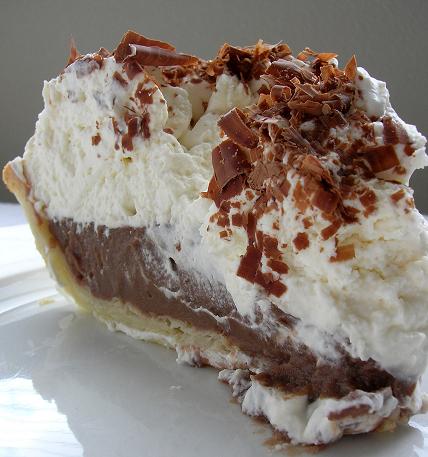
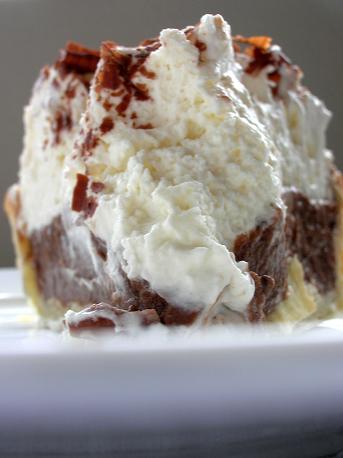
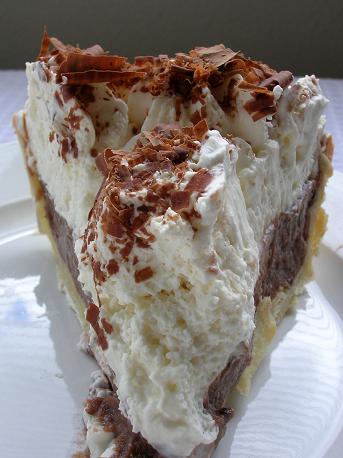
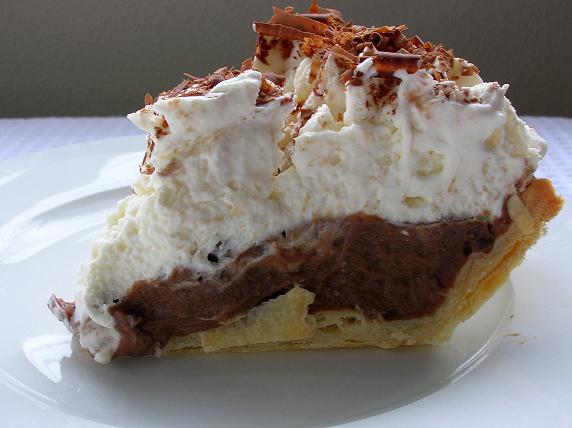
So I got lots of comments about how “perfect” my bagels looked. I tried to post back to people that those were only the “good” ones. Trust me there were some not so great ones. So I thought I would showcase something I am horrible at making….pie.
I think I am so bad at it because I just really don’t like pie all that much. I would much rather have a grunt, a Betty or a cobbler before I would reach for a pie. The only exception being Key Lime Pie, which I refuse to make at home because I would eat it all the time. So my pie making skills are less than spectacular. My crust is hit or miss. I am a bad pincher when I go around the crust, always uneven and usually have fingernail marks in it. The filling I always seem to do okay with but put it all together and it just isn’t exciting. Case in point, my very gloppy chocolate cream pie….imperfection galore. Now granted it does taste good but definitely anything less than photogenic.
My filling is a combo of different recipes from over the years that got joined together. I could not even begin to tell you where those come from. I like the use of the different chocolates but you could just stick with one or the other if you prefer.
So there you have it faithful blog readers, some pictures of my very imperfect looking pie. I better go bake something quick that looks good before I get down on myself :P.
Chocolate Cream Pie
Filling:
3 ounces semi sweet chocolate, finely chopped
3 ounces milk chocolate, finely chopped
1/2 cup heavy cream
1/2 cup plus 2 TBSP granulated sugar
5 TBSP cornstarch
2 (1 oz)squares unsweetened baking chocolate, finely chopped
Pinch salt
3 egg yolk
2-1/3 cups whole milk, divided
1 tsp. vanilla
For Filling:
Place chocolates(milk, semi sweet and unsweetened) into small heatproof bowl. In small saucepan over low heat, heat cream until very hot, stirring occasionally. Remove from heat. Add cream to chocolate. Allow to stand for a minute, then stir or whisk gently until smooth. Set aside.
In a heavy-bottomed pot, sift sugar, cornstarch, and salt. Whisk to combine well. Set aside. Place egg yolks in small bowl; with fork, gradually beat in 1/3 cup milk. Pour yolk mixture into sugar mixture in pot. With whisk, stir until combined, scraping pot sides and bottom with rubber spatula. You may have some lumps, that is okay.
In small saucepan over low heat, heat remaining 2 cups milk until very hot, stirring occasionally. Very gradually add to egg mixture, stirring constantly. When all of milk has been added, place mixture over medium heat.
Stir until mixture comes to a boil. Boil and stir 1-1/2 minutes; remove from heat. It might get lumpy at first but will smooth out.
Immediately add melted chocolate mixture and vanilla. Gently stir just until combined, then strain through fine-meshed strainer. Without waiting, fill the cooled pie crust. I don’t fill all the way because I like more whipped cream topping but if you use the whole amount it will fill the whole pie crust up. Place a piece of plastic wrap over the pie, having it touch the filling so that a skin wont form in the refrigerator; chill for at least 4 hours.
For Topping:
1 cup heavy cream
2 tablespoons confectioners’ sugar
1/2 teaspoon vanilla extract
In a mixing bowl, beat cream with confectioners’ sugar and 1/2 teaspoon vanilla extract until stiff. Spread over chocolate cream pie(I used a piping bag to make it look a little better…didn’t help much 🙂 ) . Garnish with chocolate shavings and place back in refrigerator until ready to serve. Store leftover chocolate cream pie in refrigerator.
Basic Flaky Pie Crust
Ingredients:
8 Tablespoons unsalted butter, cold
1 1/3 cups plus 4 teaspoons pastry flour or bleached all-purpose flour
¼ teaspoon salt
1/8 teaspoon baking powder (optional: if not using, double the salt)
2 ½ to 3 ½ Tablespoons heavy cream
1 ½ teaspoons cider vinegar
Method:
Divide the butter into two parts, about two-thirds to one-third (5 tablespoons and 3 tablespoons). Cut the butter into 3/4 inch cubes. Wrap each portion of butter with plastic wrap. Refrigerate the larger amount and freeze the smaller for at least 30 minutes. Place the flour, salt, and optional baking powder in a reclosable gallon-size freezer bag and freeze for at least 30 minutes.
Food processor method:
Place the flour mixture in a food processor with the metal blade and process for a few seconds to combine. Set the bag aside.
Add the larger amount of butter cubes to the flour and process for about 20 seconds or until the mixture resembles coarse meal. Add the remaining frozen butter cubes and pulse until all of the frozen butter is the size of peas. (Toss with a fork to see it better.)
Add the lowest amount of the heavy cream and the vinegar and pulse 6 times. Pinch a small amount of the mixture together between your fingers. If it does not hold together, add half the remaining cream and pulse 3 times. Try pinching the mixture again. If necessary, add the remaining cream, pulsing 3 times to incorporate it. The mixture will be in particles and will not hold together without being pinched.
For tiny 1 inch tartlets, omit the baking powder and allow the processing to continue just until a ball forms. The additional mixing produces a dough that is slightly less flaky but ensures that it will not puff out of shape in the tiny molds.
Spoon the mixture into the plastic bag. (For a double-crust pie, it is easiest to divide the mixture in half at this point.)
Holding both ends of the bag opening with your fingers, knead the mixture by alternately pressing it, from the outside of the bag, with the knuckles and heels of your hands until the mixture holds together in one piece and feels slightly stretchy when pulled.
Wrap the dough with plastic wrap, flatten it into a disc (or discs) and refrigerate for at least 45 minutes, preferably overnight. (For a pie shell and lattice, divide it in a ratio of two thirds: one third-use about 9.5 ounces for the shell and the rest for the lattice, flattening the smaller part into a rectangle.)
Hand method:
Place a medium mixing bowl in the freezer to chill.
Place the flour, salt, and optional baking powder in another medium bowl and whisk to combine them. Use a pastry cutter or rub the mixture between your fingers to blend the larger portion of the butter into the flour until it resembles coarse meal.
Spoon the mixture, together with the cold butter, into a reclosable gallon-size freezer bag. Expel any air from the bag and close it. Use a rolling pin to flatten the butter into flakes. Place the bag in the freezer for at least 10 minutes or until the butter is very firm.
Transfer the mixture to the chilled bowl, scraping the sides of the bag. Set the bag aside. Sprinkle the ice water and vinegar onto the mixture, tossing it lightly with a rubber spatula. Spoon the loose mixture back into the plastic bag. (For a double-crust pie, it is easiest to divide the mixture in half at this point.)
Holding both ends of the bag opening with your fingers, knead the mixture by alternately pressing it, from the outside of the bag, with the knuckles and heels of your hands until the mixture holds together in one piece and feels slightly stretchy when pulled.
Wrap the dough with plastic wrap, flatten it into a disc and refrigerate for at least 45 minutes, preferably overnight.
Yield: One 9-inch pie crust
Adapted from From The Pie and Pastry Bible by Rose Levy Beranbaum (Charles Scribners, 1998)
Laura says
I’ll still snag that last slice all for myself!
Intisar says
Still looks delicious to me.
caroline says
OMG. That looks so delicious! This is the kind of thing you don’t want perfect – chocolate, cream, and crust is all you need – it doesn’t even matter the order!
Tanna says
I should be so im-pie-rfect!
Totally awesome.
Ann says
I’m sorry peabody. You have miserably failed at trying to convince us that this pie is imperfect. It looks like an absolutely and perfectly delicious pie.
I should show you pictures of MY imperfection! Hahahaha!! 😀
Heath says
Um, that looks amazing. It’s a homestyle diner type pie – it’s not supposed to be all anal-retentive French patisserie perfection. I would put my ENTIRE FACE into that pie and make little oinky noises if it were not virtual.
breadchick says
Um I would really hate to see “perfection”… Now, can I have a glass of milk to go with this piece of pie? I love chocolate cream pie and yours is as fine as any I’ve seen.
Sarah says
Looks totally awesome to me! I’d pay money to eat that pie! That’s how most restaurant pies look, at least at the places I go!
Kirsten says
Yeah, umm, if this isn’t perfect looking, what else can it look like??? Those terrible gelatin-filled store-bought pies may “look” perfect, but if I am eating pie (which isn’t my fav either normally), it should look like this one. WOW!! Delicious!!
KJ says
Peabody, you are way too hard on yourself. Your pie looks absolutely delicious. It’s the sort of pie that I would get all over my face, but wouldn’t even care because it’s just so enjoyable.
Baking Soda says
To be honest, making pie crusts scares me! Like you say (not show!! cause this one looks just delicious) my crust is uneven, fingernail marks all over…
Abby says
I’ve never had a chocolate pie that looked good AND tasted good. It’s just not how things go! But I can tell that one’s great … look at that flaky crust!
Tartelette says
I think it is so imperfect that your only option is to send it all to me…hahahah!!
I feel the same way about large pies (except Key lime, like you), if they are mini I might pop more than one on my mouth.
What is it with chocolate and Key lime that make them so good with heavy cream?!!
Nicole says
Nice try! Your “imperfect” pie looks delicious. I don’t think I could stop with one piece!
mallow says
Unconvinced…I want to eat that pie! (The crust looks especially tasty!)
Elle says
May not look ‘perfect’, but that sure is drool worthy, Peabody.
YUM!
Lynn says
Who wants a pie that looks perfect? I want a pie that looks delicious and yours certainly does!
Kelly-Jane says
I would guess you are a real perfectionist, but I agree with others above – this is how home-made pie should look, yummarooo.
Claire says
Looks pretty good to me AND you’re making your own pie crust! Not that I expected anything less!
Lisa says
hahaha nice try, Gracie. That pie looks killer! It’s gorgeous.. it’s tall and chocolatey – it’s perfection in a crust!
xoxo
Chris says
No matter how you try to slice it, your pie looks pretty darn tasty! 🙂 But, I feel ya on the crusts…I get frustrated and am not a fan of rolling out any dough, let alone pie crust.
Cheryl says
I agree with Tartelette. That is the ugliest looking pie ever. Since it is too hideous for you to look at, then Fed Ex me a piece right away!!!
Britt says
I don’t trust perfect looking pies.
It’s the sloppy, juices running everywhere, crust crackling apart pies that always taste the best. Besides, thats what a big old melty scoop of ice cream is for! You’re chocolate cream pie looks perfectly delicious.
Jann says
This is certainly a winner in my book~I wish mine looked as good!
ChubbyCheekGirls says
That looks absolutely divine!
-Michelle
P.S. What can I substitute for the cider vinegar? I don’t have any and couldn’t find any at the market. Thanks!
sher says
(Very loud squeal) OH! MY! GOD! I will be thinking about that pie for ages!!!!
Kelly says
I made this pie yesterday and it turned out amazing! Thanks for the recipe.
kelly says
I’m confused about the crust- the ingredients say heavy cream but the directions say ice water?
Peabody says
Cream not water
kelly says
Also how long do you bake it and at what temp?
Peabody says
Kelly- you don’t bake a chocolate pie.
Christy says
For the 2 squares of unsweetened chocolate, do you mean 2-1oz blocks or literally 2 little squares which would equal a half ounce. I’m using baker’s chocolate and they have their squares differently than most. A one ounce block has 4mini squares. Thanks!!
Peabody says
Christy- 2 squares is 2 one ounce squares. When chocolate is attached like that it’s not called a square.
Misty says
Just made this pie for Christmas dinner. It is chilling right now and I’ll post pictures onto my blog when I’m done adding the whipped cream. I’d love to link back to your site with credit, if that’s okay.
Peabody says
@Misty- hope you like it! Sure you can link back
Nicole R says
Hi Peabody! I was wondering what you meant by 2 squared of unsweetened chocolate! Like 1/2 oz? The baking chocolate I use is usually divided up into small squares or rectangles all 1/4 oz each
Peabody says
Sorry, way old recipe. The squares refer to 1oz bakers unsweetened chocolate squares.